Meu workflow de desenvolvimento com Claude Code
Um guia detalhado sobre como eu uso IA no meu dia a dia de desenvolvimento. Do problema à validação, passo a passo.
Recentemente comecei a fazer sessões gratuitas de mentoria e o tema que invariavelmente aparece nas conversas é sobre o workflow de desenvolvimento com IA. O que funciona e o que não funciona.
Pensando nisso, decidi escrever esse guia longo e detalhado para explicar o meu processo, detalhando cada parte dele.
Durante o post vou utilizar o Claude Code como exemplo, que é o que eu uso no meu dia a dia. O fluxo e os conceitos podem ser facilmente adaptados pro seu agente de preferência.
Os 4 pilares do workflow
O workflow é pensado com 4 objetivos fundamentais. Cada um deles surgiu de um problema real que eu enfrentava no dia a dia.
Separar o problem space do solution space
Isso é uma resposta ao meu maior problema com vibe coding. Onde eu mais erro é quando eu misturo a solução com o problema.
Uma coisa que acontecia muito comigo é achar que tenho clareza do que quero construir, mas na verdade essa clareza é parcial e tem muito mais coisa ao redor que eu não pensei.
Essa premissa me obriga sempre a pensar no problema antes da solução e pra mim essa é uma das chaves do sucesso.
Separar documentação e specs de maneira clara
Desde que comecei a experimentar spec driven development, uma coisa que me deixou constantemente pensativo e insatisfeito foi pensar o melhor lugar para guardar a documentação.
O workflow visa ter uma separação clara e lógica de onde ficam specs e onde ficam as documentações de produto, visando facilitar reaproveitamento e consultas posteriores.
Human in the loop
O workflow só funciona com a participação ativa de um ser humano, que é o responsável por guiar as decisões durante todo o processo. O fluxo não é pensado para ser totalmente automatizado.
Ciclo fechado
Esse foi o último pilar e talvez o que tenha feito mais diferença. O workflow é pensado para que seja auto-verificável.
Durante o processo a gente constrói e guarda informação suficiente para que possamos usar a IA não só para construir, mas também pra validar e garantir a completude.
Background e inspiração
O workflow tem grande inspiração no que eu sempre busquei que meus times fizessem para desenvolver software:
- Definir com extrema clareza o que precisa ser feito, porque precisa ser feito e como podemos ter certeza que foi feito corretamente (critérios de aceitação)
- Planejar detalhadamente como vamos implementar, avaliando caminhos possíveis, pesando trade-offs e buscando escolher sempre o caminho mais eficiente dado o contexto
- Quebrar problemas grandes em tarefas pequenas, granulares e com separação lógica que faça sentido
- Implementar e garantir que o que foi feito atende em completude o que foi pedido, ou seja, resolve o problema e atende a todos os critérios de aceitação
Quando a gente pensa e entende os "porquês", o conhecimento é muito reaproveitável. É o que eu entendo e considero como ser alguém que busca conhecimento de first principles.
As 3 entidades principais
Antes de explicar cada passo, vamos entender as entidades que compõem o workflow:
GitHub Issues
Onde guardamos a documentação do problema: definição, critérios de aceitação e design da solução. Funciona com Trello, Jira, Linear, etc.
Claude Code
O agente que executa o processo. Os conceitos são adaptáveis a outras plataformas.
Repositório do Código
Onde fica o código e a documentação de produto. Informação reutilizada em qualquer task.
Obs: Isso faz sentido principalmente pra produtos monorepo. No caso de ter mais de um repo que atenda um produto, faz sentido extrair a documentação para outro lugar, como Confluence, Notion, etc. Assim é possível utilizar essa documentação em qualquer repositório.
Overview dos 5 passos
O workflow consiste em 5 passos. Vamos entender eles em alto nível e depois detalhar cada um.
Clarify
Garantir clareza do problema. O que está e não está no escopo, quem é afetado e quais são os critérios de aceitação.
Refine
Sair do problem space pro solution space. Explorar possíveis caminhos para resolver o problema, analisar trade-offs e escolher o mais eficiente.
Create Plan
Aprofundar no planejamento do caminho escolhido. Definir o design técnico e quebrar em tarefas granulares e independentes.
Implement
Implementação guiada pelo plano. O agente já tem toda a informação necessária. Vai "só" implementar.
Validate
Descobrir se a implementação atende completamente o escopo definido, checando código contra os critérios de aceitação.
Clarify
Issue detalhadaRefine
Research commentCreate Plan
Design + sub-issuesValidate
Relatório de validaçãoImplement
Código implementadoClarify: Clarificar requisitos
Gosto de pensar nesse passo "de trás pra frente". Para que eu consiga ter sucesso em qualquer desenvolvimento é necessário ter clareza dos requisitos, de quais são os critérios de aceitação, o que está e o que não está no escopo e quaisquer outras constraints que possam existir.
É o passo mais importante do fluxo. Se bem feito, pavimenta o caminho pro sucesso em todo o resto. Porém, se feito com desatenção, faz com que tenhamos efeitos colaterais negativos em todo o fluxo.
Issue do GitHub contendo qualquer informação mínima. Exemplos: "preciso aumentar a modal X", "não consigo usar a feature Y", "quero o filtro X na tabela Y"
Issue do GitHub detalhada com critérios de aceitação claros, definição do problema e usuário afetado.
Passo a passo
- Busca informações da issue no GitHub
- Busca contexto sobre o produto/projeto dentro do repositório, numa pasta
docs/ - Me entrevista, fazendo perguntas até responder: QUEM é afetado? O QUE não consegue fazer? QUANDO isso acontece? POR QUE isso importa? Se eu direcionar uma solução, o agente reformula como problema.
- Detalha a issue no GitHub com as informações obtidas durante a conversa
Ver prompt completo
---
allowed-tools: Bash, AskUserQuestion, Read, Glob, Grep
argument-hint: <github-issue-url-or-reference>
description: Product requirements discovery interview with documentation context (what to build)
---

# Clarify Issue Command

**Input**: $ARGUMENTS

**Skill**: Use `pm-issue` skill defined principles to guide you on the definitions

## Process

### 1. Fetch Issue

```bash
gh issue view <issue-ref> --json title,body,labels,number,url
```

Check body for parent references ("Parent: #N", "Epic: #N"). Fetch parent if found.

### 2. Gather Context

Read project docs for product context:
- `docs/**/*.md`
- `**/CLAUDE.md`

### 3. Interview

Use **AskUserQuestion** to answer the **Four Questions** (from skill):
- WHO is affected?
- WHAT can't they do?
- WHEN does this occur?
- WHY does it matter?

**Key behavior**: When user gives solution language ("add a button"), redirect to problem ("what can't users do without it?").

### 4. Write Issue

Apply skill's **Issue Structure** template with Given/When/Then criteria.

Validate with **Demo Test**: Can you describe demoing each criterion to a customer?

### 5. Confirm & Update

Ask user to confirm understanding.

If approved, update GitHub:
```bash
gh issue edit <issue-ref> --body "..."
```

Append footer: `*Clarified via /product:clarify on YYYY-MM-DD*`

### 6. Next Steps

```
Requirements clarified!

Next: /research:refine
```
Ver exemplo real
Abaixo, print da issue após execução do /product:clarify
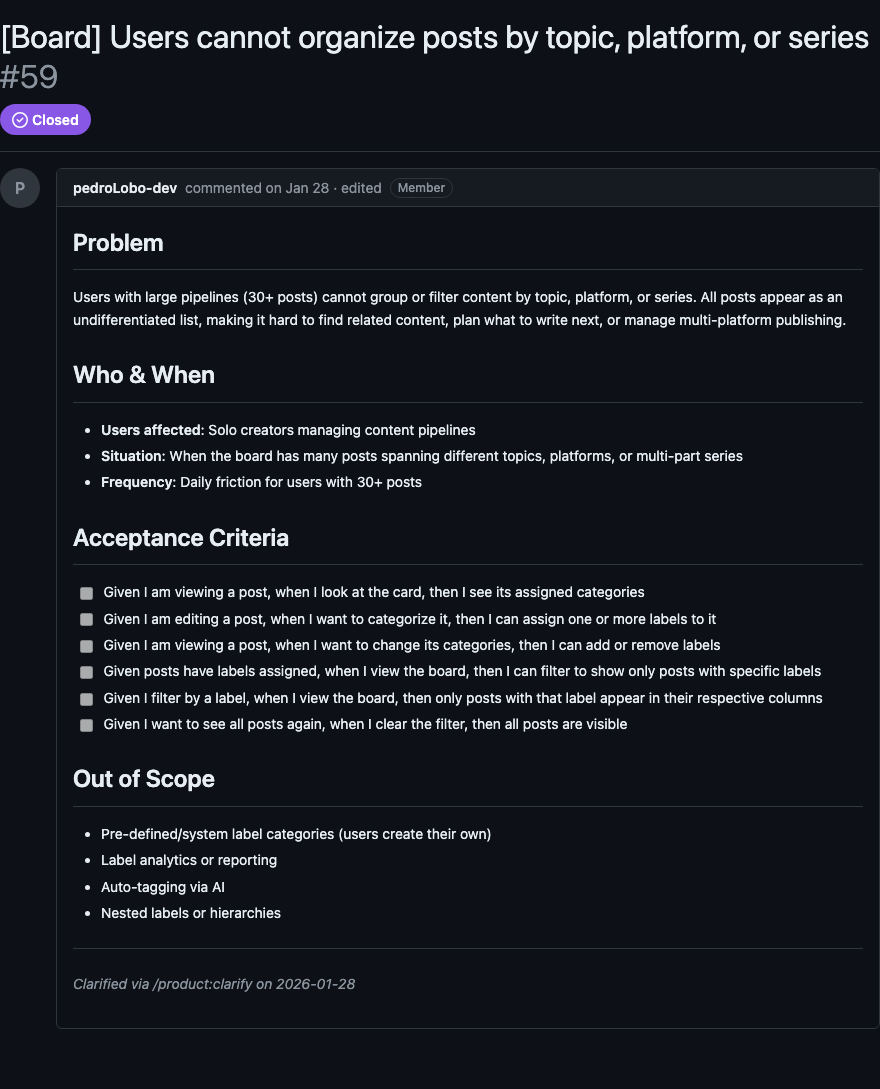
O segredo desse passo é resistir à tentação de já pensar na solução. Quando você fala "adiciona um botão", eu reformulo: "o usuário não consegue executar a ação X a partir da tela Y".
Refine: Pesquisar implementações
Esse passo vem do ritual de refinamento, que sempre julguei um dos processos mais importantes no desenvolvimento de software.
Aqui saímos do problem space e entramos no solution space. O objetivo é explorar o codebase, entender a arquitetura existente e identificar múltiplos caminhos para resolver o problema.
Issue clarificada (output do step 1), com problema bem definido e critérios de aceitação.
Comentário na issue com 2+ abordagens documentadas, cada uma com prós/contras, complexidade e arquivos afetados. Uma recomendação clara.
Passo a passo
- Busca a issue e valida que está bem especificada (tem objetivo claro, escopo e critérios)
- Lança agentes em paralelo para explorar o codebase: arquitetura e padrões, código existente na área da feature, pontos de integração e dependências
- Identifica 2+ abordagens de implementação com trade-offs claros
- Sinaliza gaps na especificação ou ambiguidades técnicas
- Me apresenta as opções e eu escolho a abordagem recomendada
- Posta o resultado como comentário estruturado na issue
O ponto-chave aqui é que eu acredito que um bom plano depende de três coisas:
- Análise de não só 1, mas sim N caminhos possíveis
- Avaliação clara dos trade-offs de cada caminho
- Uma escolha que leve em conta os trade-offs, buscando o caminho mais eficiente dado o contexto
Ver prompt completo
---
allowed-tools: Task(codebase-analyzer), Bash, Read, Glob, Grep, AskUserQuestion
argument-hint: <github-issue-url-or-number>
description: Technical implementation research for specified issues (posts to GitHub)
---
# Refine Command
**Input**: $ARGUMENTS
## Purpose
Technical implementation research for well-specified GitHub issues. Focuses on understanding the codebase, exploring solution approaches, and identifying specification gaps. Results are posted as a GitHub comment.
**Prerequisite**: Issue should be well-specified with clear requirements.
**Focus**: Implementation-focused research - understanding existing code and exploring how to build.
**Output**: GitHub comment with research findings.
## Instructions
### 1. Fetch GitHub Issue
Accept input as:
- GitHub issue URL (e.g., `https://github.com/owner/repo/issues/123`)
- GitHub issue reference (e.g., `#123` or `owner/repo#123`)
Use `gh issue view <issue-ref> --json title,body,labels,number,url` to fetch issue details.
### 2. Present Issue Context
Show the user:
```
Issue #N: [Title]
URL: [URL]
Labels: [labels]
Description:
[Brief summary of issue body]
Proceeding with implementation research...
```
### 3. Validate Specification Completeness
Review the issue and check if it's well-specified enough for implementation research.
**Check for**:
- Clear goal/outcome defined
- Scope boundaries established
- Success criteria or acceptance criteria present
- Specific requirements (not vague requests)
**If specification is incomplete**, use **AskUserQuestion** to clarify.
### 4. Codebase Analysis
Use **multiple codebase-analyzer agents in parallel** to understand:
**Architecture & Patterns**:
- Current architecture patterns relevant to this issue
- How similar features are implemented
- Conventions and patterns to follow
**Relevant Existing Code**:
- What already exists related to this issue
- Components that could be leveraged
- Files that will likely need modification
**Integration Points**:
- Where new code would need to integrate
- Dependencies on existing code
- APIs or interfaces involved
Launch agents strategically:
- Agent 1: Architecture and patterns analysis
- Agent 2: Existing code discovery for the feature area
- Agent 3: Integration points and dependencies
### 5. Solution Exploration
Based on codebase analysis, identify possible implementation approaches:
**For each approach**:
- What it involves
- Pros and cons
- Complexity level
- Files/components affected
**Trade-offs to consider**:
- Reuse existing code vs. build new
- Simple solution vs. flexible/extensible
- Quick implementation vs. thorough approach
### 6. Gap Identification
Identify any specification gaps or ambiguities discovered during research.
### 7. Ask Clarifications
If significant gaps are found, use **AskUserQuestion** to clarify.
### 8. User Approach Selection
After presenting the approaches, use **AskUserQuestion** to let the user choose their preferred approach. All approaches will be documented in the GitHub comment regardless of selection.
### 10. Generate GitHub Comment
Post research findings to the issue using:
```bash
gh issue comment <issue-ref> --body "$(cat <<'EOF'
## Implementation Research
### Codebase Context
[Relevant existing code, patterns, architecture discovered]
### Possible Implementation Approaches
#### Option 1: [Name]
- **Description**: [What it involves]
- **Pros**: [Benefits]
- **Cons**: [Drawbacks]
- **Complexity**: Low/Medium/High
- **Files affected**: [Key files]
#### Option 2: [Name]
...
### Specification Gaps
[Any missing details or ambiguities identified]
### Recommendations
**Suggested approach**: [User's selected approach]
EOF
)"
```
## Communication Style
- Technical and implementation-focused
- Concise but thorough
- Present options with clear trade-offs
- Ask clarifying questions when needed
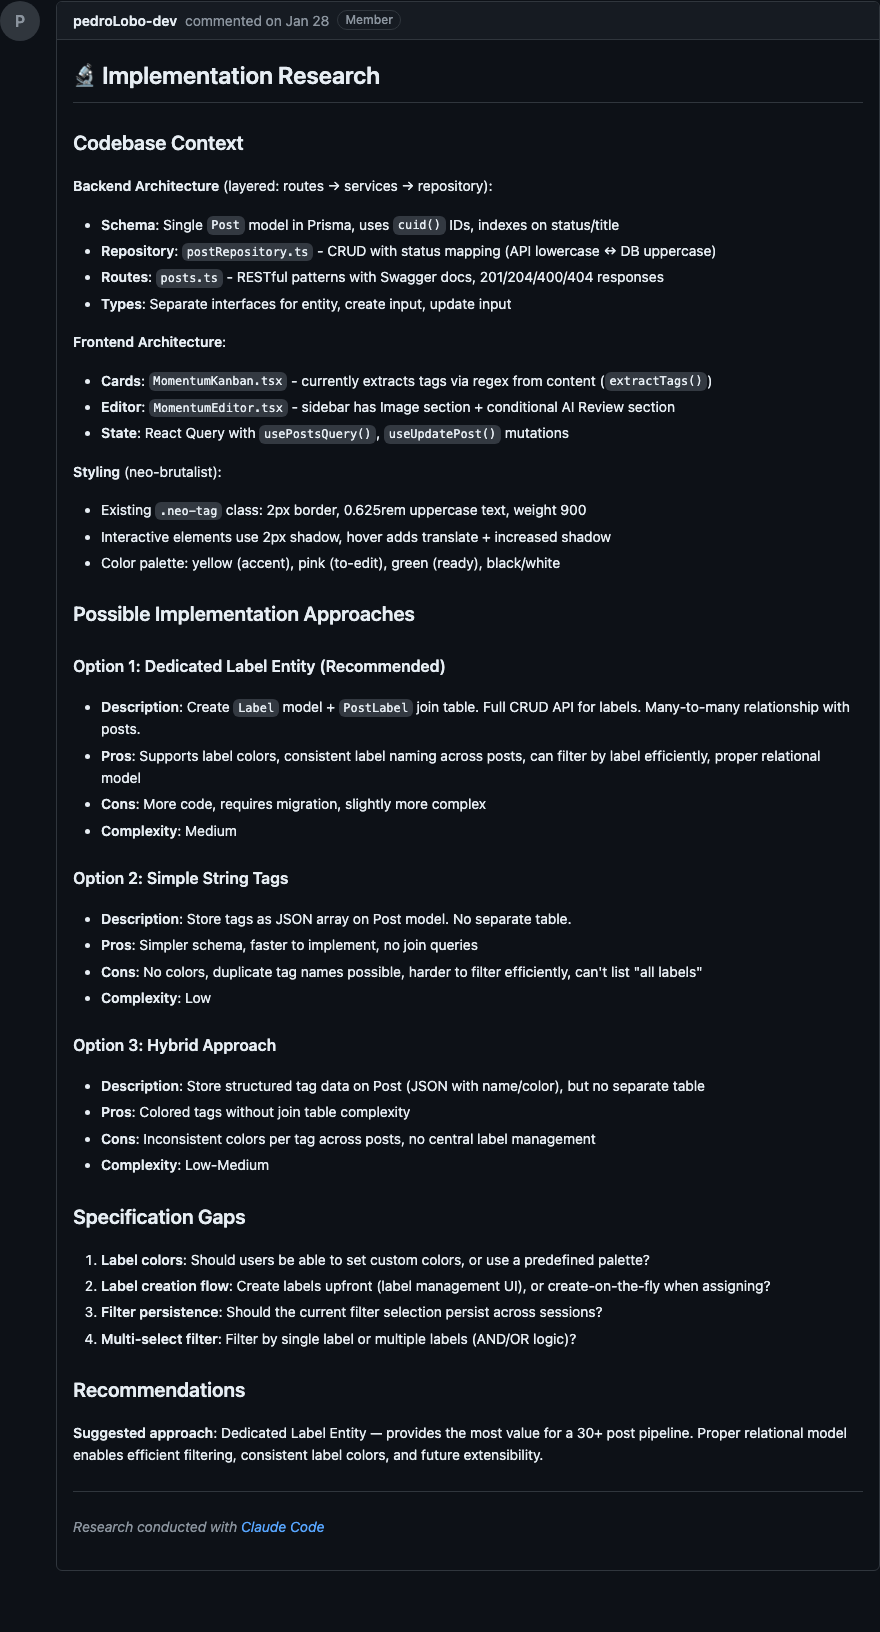
- Focus on HOW to build, not WHAT to buildVer exemplo real
Abaixo, print do comentário de pesquisa após execução do /research:refine
Create Plan: Plano de implementação
Chegando nesse passo já temos problema e escopos bem definidos. Também temos opções de caminhos e uma abordagem escolhida. Agora é hora de aprofundar no planejamento.
Issue com requisitos clarificados + comentário de research com abordagem escolhida.
Comentário de Design na issue (arquitetura, componentes, fluxo de dados) + sub-issues no GitHub, uma por tarefa.
Passo a passo
- Busca a issue e todos os comentários; verifica que os pré-requisitos existem (clarify + refine)
- Analisa o codebase em paralelo para entender arquitetura, módulos afetados e pontos de integração
- Gera um documento de Design cobrindo: abordagem escolhida, arquitetura, componentes-chave, fluxo de dados, tratamento de erros, compatibilidade
- Me apresenta o design para aprovação, e itera até eu aprovar
- Quebra o design em tarefas discretas com títulos imperativos ("Criar...", "Adicionar...", "Implementar...")
- Identifica dependências entre tarefas e sugere ordem de execução
- Me apresenta a lista de tarefas para aprovação
- Cria uma sub-issue por tarefa no GitHub, todas com a label do épico
- Posta um índice de tarefas como comentário na issue principal
O resultado é que saímos desse passo com tudo que precisamos pra desenvolver. Cada tarefa é granular, independente e tem seus próprios critérios de aceitação.
Ver prompt completo
---
allowed-tools: Task(codebase-analyzer), Bash, Read, Glob, Grep, AskUserQuestion
argument-hint: <github-issue-url-or-number>
description: Create implementation plan from GitHub issue (design + tasks as sub-issues)
---

# Create Plan Command

**Input**: $ARGUMENTS

## Purpose

Create an implementation plan for a GitHub issue. All documentation lives on GitHub - design as a comment, tasks as sub-issues with a task list for tracking.

**Prerequisites**:
- Issue has clarified requirements (from `/product:clarify`)
- Issue has research comment (from `/research:refine`)

**Output**:
- Design comment on issue
- Sub-issues for each task
- Tasks index comment with GitHub task list

## Instructions

### 1. Validate GitHub Issue Input

**Input**: GitHub issue URL or issue number (REQUIRED)

### 2. Fetch Issue Details

**Step 2.1: Fetch issue metadata**

```bash
gh issue view <issue-ref> --json title,body,labels,number,url
```

**Step 2.2: Fetch all comments**

```bash
gh api repos/{owner}/{repo}/issues/{number}/comments --paginate
```

### 3. Verify Prerequisites

**Step 3.1: Verify clarified requirements exist**

Look in issue body for clarified requirements section.

**If no clarified requirements found**, stop and inform:
```
No clarified requirements found for issue #N
To add requirements, run: /product:clarify #N
```

**Step 3.2: Verify research exists in comments**

Look for headers like `## Implementation Research`.

**If no research comment found**, stop and inform:
```
No research found for issue #N
To add research, run: /research:refine #N
```

### 4. Present Issue Context

Show: Issue number, title, URL, requirements summary, research summary.

### 5. Codebase Analysis

Use **multiple codebase-analyzer agents in parallel** to gather comprehensive insights. Focus on architecture, patterns, affected files, integration points.

### 6. Create Design

**Generate design content** covering:
- **Chosen Approach**: Which option from research and why
- **Architecture**: How it fits into the system
- **Key Components**: Main pieces to build/modify
- **Data Flow**: How data moves through the system
- **Integration Points**: Where new code connects with existing
- **Error Handling**: How errors will be managed
- **Backward Compatibility**: Breaking changes (if any)

### 7. Design Approval Gate

Present design to user via **AskUserQuestion**:
- **Approve** — Post design as comment
- **Request changes** — Specify what needs adjustment

If approved, post as GitHub comment:

```bash
gh issue comment <issue-ref> --body "$(cat <<'EOF'
## Design

[Design content here]

---
*Design created with Claude Code*
EOF
)"
```

### 8. Task Identification

1. **Identify tasks** based on distinct implementation units
2. **For each task**: Clear title (imperative form), description with acceptance criteria, dependencies
3. **Identify task dependencies**: Which can be parallel, suggested order
4. **Present summary for approval** via AskUserQuestion

### 9. Ensure Epic Label Exists

```bash
gh label create "epic:issue-N" --description "Tasks for issue #N: [Title]" --color "$(openssl rand -hex 3)"
```

### 10. Create Sub-Issues

For each approved task:

```bash
gh issue create --title "[#N] <Task Title>" --body "$(cat <<'EOF'
Parent: #N

## Description
[Task description]

## Acceptance Criteria
- [ ] [Criterion 1]
- [ ] [Criterion 2]

## Dependencies
[List tasks that must complete first, or "None"]

## Implementation Notes
[Specific guidance from design]
EOF
)" --label "epic:issue-N"
```

### 11. Post Tasks Index Comment

```bash
gh issue comment <issue-ref> --body "$(cat <<'EOF'
## Tasks

### Task List
- [ ] #X1 Task 1 title
- [ ] #X2 Task 2 title

### Dependencies
- #X2 depends on: #X1
- #X1 (none, can start immediately)

### Suggested Order
1. #X1 - [Title] (no dependencies)
2. #X2 - [Title] (after #X1)
EOF
)"
```

## Communication Style

- **Interactive**: Approval gates at design and tasks stages
- **GitHub-native**: Everything lives on GitHub issues
- **Traceable**: Sub-issues link back to parent

## What This Command Does NOT Do

- Create local documentation files
- Clarify requirements (use `/product:clarify`)
- Conduct research (use `/research:refine`)
- Implement code (use `/development:implement-plan`)
Ver exemplo real
Abaixo, prints de Design e Tasks após execução do /planning:create-plan
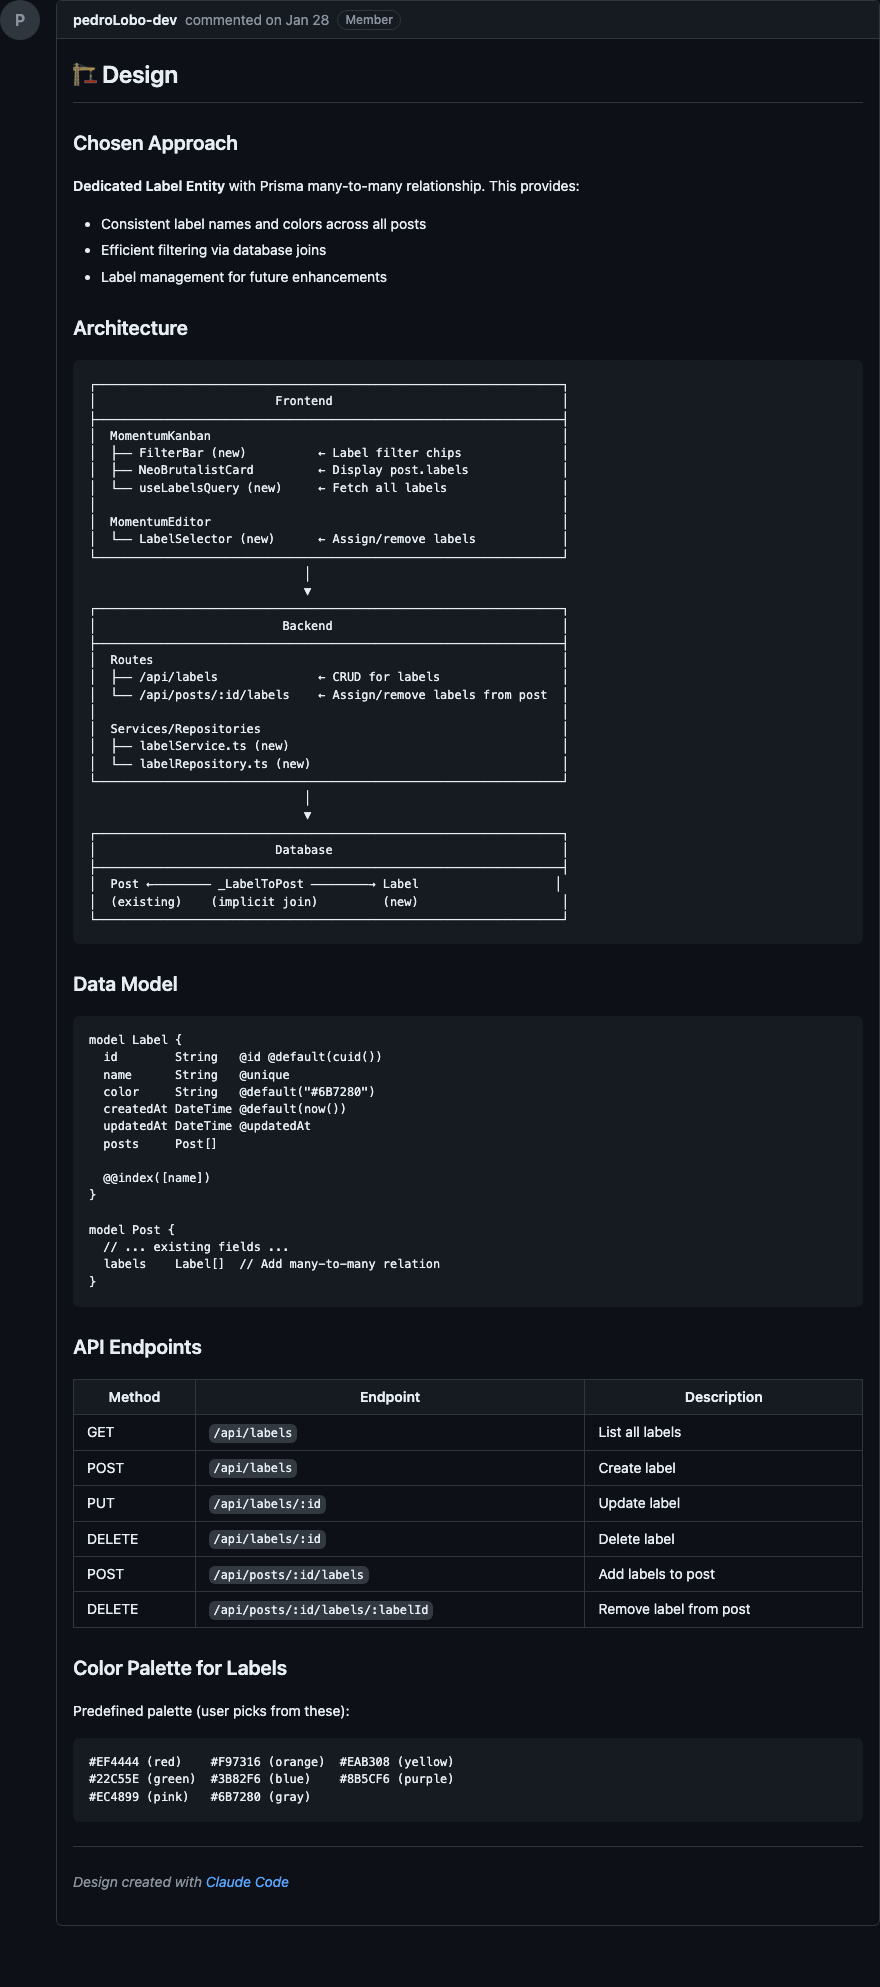
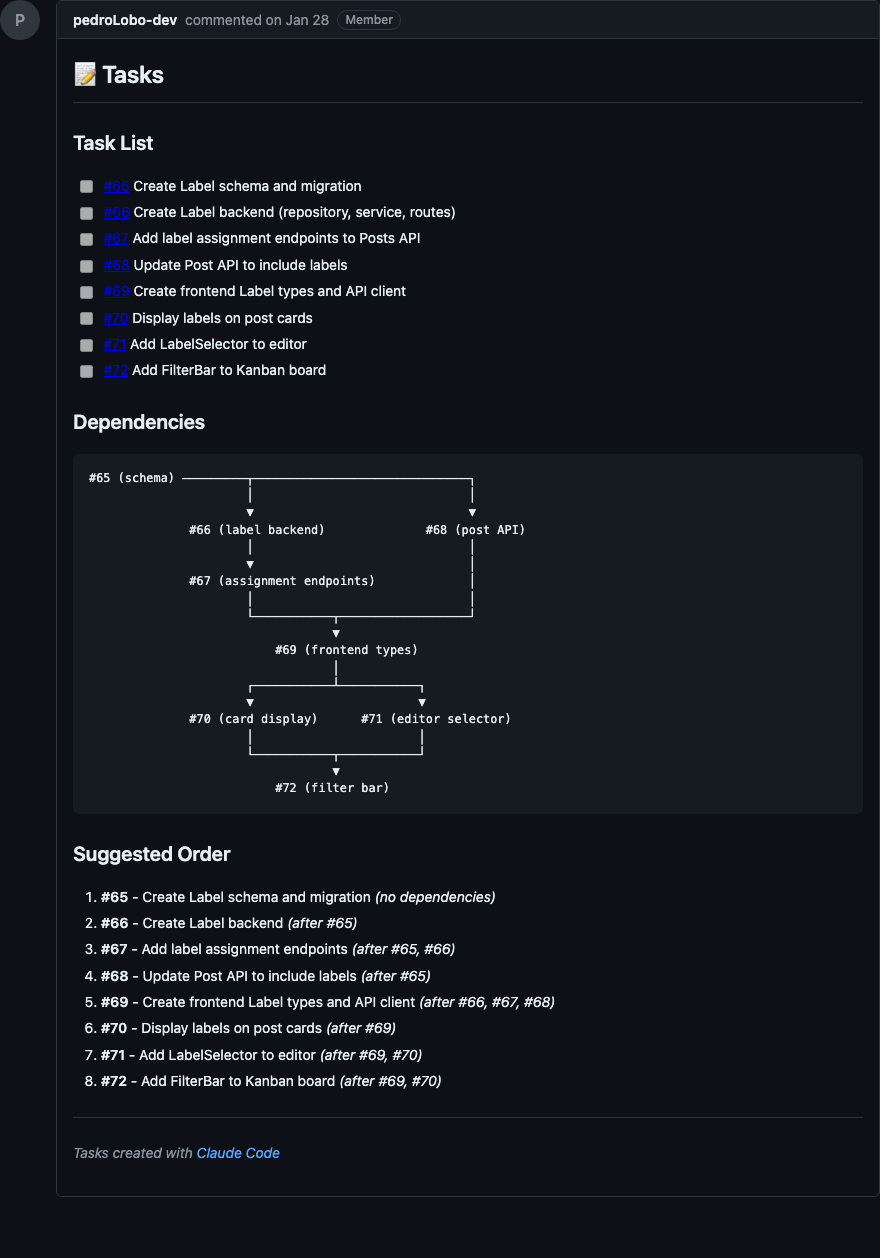
Esse passo tem dois gates de aprovação: um pro design e outro pra lista de tarefas. Isso garante que eu valido tanto a arquitetura quanto a granularidade das tarefas antes de qualquer código ser escrito.
Implement: Implementar o plano
Aqui é onde o código acontece. A implementação é 100% guiada pelo plano definido no passo anterior, e isso é super importante.
Issue com requisitos + design + sub-issues de tarefas.
Código implementado, sub-issues fechadas conforme conclusão.
Passo a passo
- Busca toda a informação: metadata da issue, design, índice de tarefas e todas as sub-issues
- Se estiver na
main, cria uma branch para o épico - Me apresenta o contexto: resumo dos requisitos, resumo do design, lista de tarefas com status
- Me pergunta: implementar tarefa individual ou todas as restantes?
- Organiza as tarefas em camadas de dependência: Layer 1 (sem deps), Layer 2 (depende da L1), etc.
- Implementa camada por camada, lançando agentes em paralelo para tarefas da mesma camada
- Após cada tarefa: me informa o que foi feito e pede validação antes de fechar a sub-issue
- Nunca avança para a próxima camada sem minha confirmação
O ponto mais importante: o agente já tem toda a informação necessária detalhada. Ele vai "só" implementar. Isso é o que torna a implementação consistente e previsível.
Ver prompt completo
---
allowed-tools: TodoWrite, Read, Glob, Bash, Grep, AskUserQuestion, Skill, Task
argument-hint: <github-issue-number>
description: Implement an epic, fix, or feature with todo tracking
---

# Plan Implementation Command

**Input**: $ARGUMENTS (GitHub issue number or reference)

## Purpose

Implement tasks from a GitHub issue that has been planned via `/planning:create-plan`. This command reads the design and tasks from GitHub, guides implementation, and closes sub-issues as tasks are completed.

**Prerequisites**:
- Issue has clarified requirements (from `/product:clarify`)
- Issue has design comment (from `/planning:create-plan`)
- Issue has sub-issues for tasks (from `/planning:create-plan`)

## Instructions

### 1. Resolve GitHub Issue

Fetch issue metadata:

```bash
gh issue view <N> --json title,body,labels,number,url
```

### 2. Create Feature Branch (if on main)

```bash
git branch --show-current
git checkout -b epic/issue-<N>
```

### 3. Fetch Issue Content

**Step 3.1: Get issue body (requirements)**
```bash
gh issue view <N> --json body -q .body
```

**Step 3.2: Get issue comments (design + tasks index)**
```bash
gh api repos/$(gh repo view --json nameWithOwner -q .nameWithOwner)/issues/<N>/comments --paginate
```

Parse comments to find:
- **Design comment**: Contains `## Design`
- **Tasks index comment**: Contains `## Tasks`

**Step 3.3: Get sub-issues (tasks)**
```bash
gh issue list --label "epic:issue-<N>" --json number,title,state,body --limit 100
```

### 4. Present Context to User

Display: Issue info, requirements summary, design summary, task list with status.

### 5. Task Selection

Use **AskUserQuestion** to let user select:
- Individual task selection (list open tasks)
- "All remaining tasks" - implement all open tasks

### 6. Build Dependency Layers

Group selected tasks into execution layers:
- **Layer 1**: Tasks with no dependencies (can start immediately)
- **Layer 2**: Tasks that depend only on Layer 1 tasks
- **Layer N**: Tasks that depend only on tasks in previous layers

### 7. Create Todo List

Use **TodoWrite** to create implementation checklist organized by dependency layers.

### 8. Implement Layers via Task Agents

Process each dependency layer in order.

**Step 8.1: Launch parallel Task agents**

Spawn one **general-purpose** Task agent per task in the current layer. All agents in a layer launch simultaneously.

Each agent receives:
```
Implement the following task.

## First Steps
- Read the project's CLAUDE.md files
- Read the relevant existing files before making changes

## Design Context
[Full design comment from parent issue]

## Task: #XX - [Task Title]
[Full sub-issue body: description, acceptance criteria, implementation notes]

## Instructions
- Follow the project's existing patterns and conventions
- Implement all acceptance criteria listed in the task
```

**IMPORTANT - Frontend Tasks**: Add to the agent prompt:
```
- Use the `frontend-design` skill for UI component implementation
```

**Step 8.2: Collect results**

Wait for all agents to complete. Update todo list.

**Step 8.3: User validation per layer**

**IMPORTANT**: Never proceed to the next layer without user confirmation.

### 9. Validate Against Acceptance Criteria

After each layer: verify criteria met, design patterns followed, code integrates properly.

### 10. User Validation

**IMPORTANT**: Never close issues automatically. Always ask user to validate first.

### 11. Close Completed Sub-Issues

After user confirms:
```bash
gh issue close <task-number> --comment "Completed via /development:implement-plan"
```

### 12. Completion Summary

Display progress: completed tasks, remaining tasks, X of Y completed.

### 13. Next Action Prompt

Use **AskUserQuestion** with options:
- **Continue implementing** — Run again for more tasks
- **Validate changes** — Run /development:validate
- **Commit changes** — Run /meta:commit
- **Done for now** — Stop here

## Notes

- **GitHub-native**: All specs and tracking live on GitHub issues
- **Dependency layers**: Tasks grouped by dependencies, implemented layer-by-layer
- **Parallel agents**: Independent tasks within a layer implemented simultaneously
- **User validation**: Always confirms before closing issues and before next layer
- **Frontend tasks**: Agent prompts reference `frontend-design` skill
Ver exemplo real
Abaixo, print das sub-issues após execução do /development:implement-plan
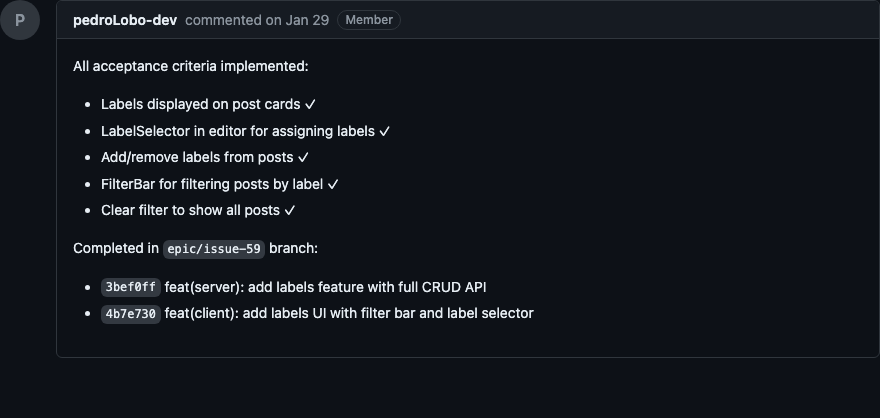
Validate: Validar a implementação
Queremos, nesse passo, descobrir se a implementação feita atende completamente o escopo definido. Como temos toda a documentação do problema e critérios de aceitação, é possível delegar ao agente a missão de checar se o código implementado atende a todos esses critérios.
Issue com critérios de aceitação + código implementado.
Relatório de validação com status por critério (Pass / Fail / Partial / Skipped) + evidências.
Passo a passo
- Busca a issue; determina se é uma sub-issue ou o épico principal
- Extrai todos os critérios de aceitação
- Analisa o histórico recente do git para entender o que foi alterado
- Cria um plano de validação, onde cada critério recebe um método: inspeção de código, teste via browser, verificação de comandos (
tsc,lint, etc.), teste de API, ou teste manual - Me apresenta o plano para aprovação
- Executa a validação: agentes paralelos para inspeção de código, testes de browser, comandos de verificação, e guia de testes manuais
- Gera o relatório final: cada critério com Pass / Fail / Partial / Skipped + evidências (referências
arquivo:linha, output de comandos) - Me apresenta próximos passos: se tudo passou → fechar issue; se algo falhou → corrigir ou criar follow-up
Esse passo fecha o ciclo. É o que garante que não estamos "achando" que está pronto. Estamos verificando de fato contra os critérios que definimos lá no início.
Ver prompt completo
---
allowed-tools: Read, Glob, Bash, Grep, AskUserQuestion, Skill, Task(codebase-analyzer)
argument-hint: <github-issue-number>
description: Validate implementation against acceptance criteria
---

# Validation Command

**Input**: $ARGUMENTS (GitHub issue number or reference)

## Purpose

Validate that implemented work meets all acceptance criteria from a GitHub issue. Reviews recent commits, analyzes diffs, and creates a validation checklist to systematically verify each criterion.

## Instructions

### 1. Resolve GitHub Issue

```bash
gh issue view <N> --json title,body,labels,number,url,state
```

**Determine issue type**:
- If issue has `epic:issue-*` label: It's a task sub-issue, validate just this task
- If issue has sub-issues: It's a parent epic, offer to validate individual tasks or all

### 2. Gather Acceptance Criteria

**For a task sub-issue**: Extract from issue body.

**For a parent epic**:
```bash
gh issue list --label "epic:issue-<N>" --state closed --json number,title,body --limit 100
```

Collect acceptance criteria from all closed sub-issues.

### 3. Analyze Recent Changes

```bash
git log --oneline -20
git diff --stat main...HEAD
git diff --name-only HEAD~5
```

Categorize: Frontend files, Backend files, Configuration, Tests.

### 4. Present Validation Context

Show: Issue info, acceptance criteria list, recent commits, files changed.

### 5. Create Validation Plan

For each criterion, determine validation approach:

1. **Code inspection** - Read files to verify implementation
2. **Browser testing** - Chrome plugin, Playwright CLI, or manual
3. **Manual testing** - User-guided steps
4. **Command verification** - `tsc`, `npm run lint`, etc.
5. **API testing** - `curl` commands

Present plan as table:
```
| # | Criterion | Method | What to check |
|---|-----------|--------|---------------|
| 1 | [Short description] | Code | [file.ts] |
| 2 | [Short description] | Browser | [URL + element] |
```

### 6. Approval

Use **AskUserQuestion**:
- **Run all** — Execute full validation plan
- **Code checks only** — Skip manual tests
- **Adjust plan** — Modify criteria
- **Cancel** — Don't validate now

### 7. Execute Validation

**Step 7.1: Parallel code inspections**

Launch parallel **codebase-analyzer** Task agents. Each validates criteria by reading code:

```
Validate the following acceptance criteria against the codebase.

Task: #XX - [Task Title]

Criteria to validate:
- [ ] [Criterion 1]
- [ ] [Criterion 2]

For each criterion, return:
- Status: PASS or FAIL
- Evidence: file:line references
- Notes: any observations
```

**Step 7.2: Browser testing**

Use Chrome web plugin (preferred) or Playwright CLI (fallback):
1. Check if dev server is running
2. Request screenshots, element checks, console output
3. For interactive criteria, user performs action while plugin captures state

**Step 7.3: Run verification commands**

Run commands, capture and analyze output.

**Step 7.4: Guide manual testing**

Provide clear test steps. Use **AskUserQuestion** to collect results:
- **Pass** / **Fail** / **Partial** / **Skip**

### 8. Collect Evidence

For each criterion: Status, Evidence (file:line, command output), Notes.

### 9. Validation Report

```
Validation Report - Issue #N

Summary: [X/Y criteria passed]

Results:
  Pass  Criterion 1: [Description]
        Evidence: [What verified it]

  Fail  Criterion 3: [Description]
        Issue: [What failed]
        Suggestion: [How to fix]

Overall: [PASS / FAIL / PARTIAL]
```

### 10. Next Actions

**If all pass**: Close issue / Commit / Done
**If some fail**: Fix issues / Create follow-up / Re-validate / Accept as-is

## Notes

- **Non-destructive**: Only reads and analyzes, never modifies code
- **Evidence-based**: Every pass/fail has documented evidence
- **Browser validation**: Chrome plugin (preferred) or Playwright CLI (fallback)
- **User-driven**: Manual tests require user confirmation
- **Actionable**: Failed criteria come with fix suggestions
Ver exemplo real
Abaixo, print da validação após execução do /development:validate
| Método | Quando usar | Exemplo |
|---|---|---|
| Inspeção de código | Verificar se API existe, componente renderiza | Leitura dos arquivos fonte |
| Teste via browser | Validar comportamento visual e interações | Playwright ou teste manual |
| Comandos | Garantir que build e lint passam | tsc --noEmit, npm run lint |
| Teste de API | Validar endpoints e respostas | Requisições curl |
| Teste manual | Fluxos que exigem interação humana | Passo a passo guiado |
Conclusão
O que faz esse workflow funcionar não é nenhuma ferramenta específica. É a disciplina de separar claramente o problema da solução, planejar antes de implementar e validar contra critérios objetivos.
Cada passo gera um artefato documentado que alimenta o próximo. Isso cria um ciclo onde a informação necessária está sempre disponível, tanto pra mim quanto pro agente.
O resultado prático é que eu erro muito menos, gasto menos tempo corrigindo rumo e tenho muito mais confiança no que é entregue. E quando algo dá errado, consigo rastrear exatamente onde o processo falhou.
Se você quer começar, minha sugestão é simples: comece pelo Clarify. Só o hábito de escrever critérios de aceitação antes de codar já vai mudar a qualidade do seu output.